NavigatorLayout 导航布局
基础使用
使用 NavigatorLayout,需要以下步骤:
- 写一个
React组件,继承tuya-panel-kit提供的NavigatorLayout。 - 重写
renderScene方法以渲染用户自己的页面,需要返回一个合法的React组件。 - 如果需要实现更精细的路由控制,如实现页面标题、页面背景等功能,可以通过重写
hookRoute方法去实现。
代码演示
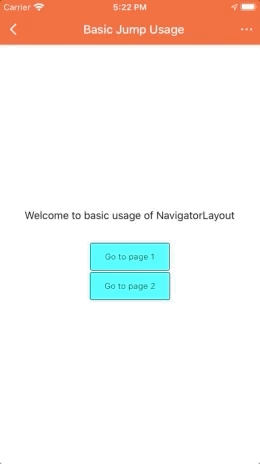
在两个页面之间跳转
可运行我们托管在 Github 提供的 demo 查看效果
首先定义好一个路由配置,然后写一个组件继承自 NavigatorLayout。
这里我们定义了两个页面的路由表 (routers), 分别是 page1 和 page2,在 renderScene 方法里我们可以拿到 Navigator,以及当前路由对象的情况,然后我们在渲染页面的时候, 根据当前路由的 id 去路由表查找相应的页面,如果没有对应的页面,我们就渲染默认的主页。
import React from 'react';import { NavigatorLayout, Theme } from 'tuya-panel-kit';import Page from './page';import Home from './home';const routers = [{id: 'page1',title: 'page1',Scene: props => <Page {...props} num={1} />,},{id: 'page2',title: 'page2',Scene: props => <Page {...props} num={2} />,},];class MainLayout extends NavigatorLayout {hookRoute(route) {const theRoute = routers.find(r => r.id === route.id);return {...route,topbarStyle: { backgroundColor: '#ff6024' },topbarTextStyle: { color: '#fff' },showOfflineView: false, // 此处为了基础功能调试才关闭设备离线蒙层,生产环境需要开启title: route.id === 'main' ? 'Basic Jump Usage' : theRoute.title,};}renderScene(route, navigator) {let Scene = <Home navigator={navigator} />const router = routers.find(r => r.id === route.id);if (router && router.Scene) {const Component = router.Scene;Scene = <Component navigator={navigator} {...route} />}return Scene;}}const ThemedMainLayout = props => (<Theme theme={{}}><MainLayout {...props} /></Theme>);export default ThemedMainLayout;
下面是 page 和 home 的实现,通过 Navigator 的 push 方法,我们能跳转到某个页面,通过 pop 方法,能回退到上一个页面。
// page.jsimport React from 'react';import { View, Text, StyleSheet } from 'react-native';import { Button } from 'tuya-panel-kit';export default ({ num, navigator }) => (<View style={[styles.container, styles.center]}><Text style={styles.welcomeTxt}>This is Page {num}</Text><Button style={styles.btnStyle} onPress={() => navigator.pop()}><Text style={styles.navTxt}>Click to go back!</Text></Button></View>);
// home.jsimport React from 'react';import { View, StyleSheet, Text } from 'react-native';import { Button } from 'tuya-panel-kit';export default ({ navigator }) => (<View style={[styles.container, styles.center]}><Text style={styles.welcomeTxt}>Welcome to basic usage of NavigatorLayout</Text>{[1, 2].map(v => (<Buttonstyle={styles.btnStyle}key={v}onPress={() => navigator.push({ id: `page${v}` })}><Text style={styles.navTxt}>Go to page {v}</Text></Button>))}</View>);
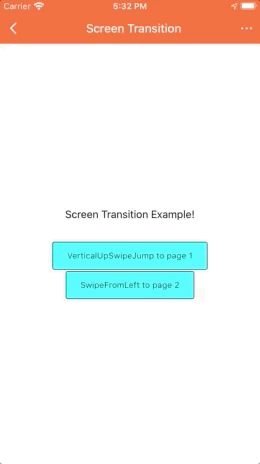
自定义过渡动画效果
可运行我们托管在 Github 提供的 demo 查看效果
NavigatorLayout 使用了默认的页面过渡动画配置,体现出的行为将会是: 新增页面表现为从左向右, 回退则是表现为从右到左。
const SceneConfigs = {...Navigator.SceneConfigs.HorizontalSwipeJump,gestures: {pop: {...Navigator.SceneConfigs.FloatFromRight.gestures.pop,},},};
如果想要自定义页面过渡动画配置,我们可以修改下 navigator.push 传入的参数,即可自定义过渡动画,下面我们使用了效果 VerticalUpSwipeJump 和 SwipeFromLeft, 以下是效果图:
如果有其他过渡动画需求的用户可以参考 React Native Navigator 过渡动画来配置自己想要的过渡动画效果。
// home.jsimport React from 'react';import { View, StyleSheet, Text } from 'react-native';import { Button } from 'tuya-panel-kit';import { Navigator } from '@tuya-rn/react-native-deprecated-custom-components';const sceneConfig = {...Navigator.SceneConfigs.HorizontalSwipeJump,gestures: {pop: {...Navigator.SceneConfigs.FloatFromRight.gestures.pop,},},};const RouterConfig = [{txt: `VerticalUpSwipeJump to page 1`,transition: {...sceneConfig,...Navigator.SceneConfigs.VerticalUpSwipeJump,},},{txt: `SwipeFromLeft to page 2`,transition: {...sceneConfig,...Navigator.SceneConfigs.SwipeFromLeft,},},];export default ({ navigator }) => (<View style={[styles.container, styles.center]}><Text style={styles.welcomeTxt}>Screen Transition Example!</Text>{[1, 2].map(v => (<Buttonstyle={styles.btnStyle}key={v}onPress={() =>navigator.push({id: `page${v}`,sceneConfigs: RouterConfig[v - 1].transition,})}><Text style={styles.navTxt}>{RouterConfig[v - 1].txt}</Text></Button>))}</View>);
API
class NavigatorLayout<P = {}, S = {}> extends React.Component<P,{ modalVisible: boolean } & S> {hookRoute(route: DeprecatedNavigatorRoute): NavigationOptions;renderScene(route: DeprecatedNavigatorRoute,navigator: DeprecatedNavigator,): JSX.Element | undefined;}
hookRoute
用于控制常见页面 UI,参见此前类型签名,
hookRoute接收一个参数route,需要返回一个合法的NavigationOptions,NavigatorLayout内部会通过hookRoute的返回值去对应渲染当前页面的相关 UI。
// 页面的路由信息,首页为固定值,其他页面由用户通过 navigator.push 时附带的参数决定interface DeprecatedNavigatorRoute {id: string;[routeProp: string]: any;}interface NavigationOptions {/*** @desc 自定义面板背景* number: 渲染本地图片* string: 渲染颜色* { uri: string }: 渲染网络图片* RadialGradientBackground: 渲染径向渐变* LinearGradientBackground: 渲染线性渐变**/background?:| number| string| { uri: string }| RadialGradientBackground| (LinearGradientBackground & LinearGradientBackgroundOffset);/*** @desc 自定义头部栏样式*/topbarStyle?: StyleProp<ViewStyle>/*** @desc 自定义头部栏文字样式*/topbarTextStyle?: StyleProp<TextStyle>/*** @desc 自定义面板背景样式*/backgroundStyle?: StyleProp<ViewStyle>/*** @desc 自定义头部栏标题*/title?: string;hideTopbar?: boolean;/*** @desc 控制是否显示离线遮罩* @default true*/showOfflineView?: boolean;gesture?: boolean;/*** @desc 是否启用首页手势返回 app 列表页面* @default true*/enablePopGesture?: boolean;/*** @desc 蓝牙离线提示是否覆盖整个面板(除头部栏外)* @default true*/isBleOfflineOverlay?: boolean;/*** @desc 自定义渲染头部栏*/renderTopBar?: () => JSX.Element;/*** @desc 自定义渲染状态栏*/renderStatusBar?: () => JSX.Element;}
renderScene
用于渲染页面组件,参见此前类型签名,
renderScene接收两个参数,route和navigator,需要返回一个合法的JSXElement,参数的具体类型签名见下,其中需要注意的是首页的route.id固定为main。
// 页面的路由信息,首页为固定值,其他页面由用户通过 navigator.push 时附带的参数决定interface DeprecatedNavigatorRoute {id: string;[routeProp: string]: any;}// 即 React Native 提供的 Navigator apiinterface DeprecatedNavigator {getCurrentRoutes(): DeprecatedNavigatorRoute[];immediatelyResetRouteStack(nextRouteStack: DeprecatedNavigatorRoute[]): void;jumpBack(): void;jumpForward(): void;jumpTo(route: DeprecatedNavigatorRoute): void;pop(): void;popN(n: number): void;popToRoute(route: DeprecatedNavigatorRoute): void;popToTop(): void;push(route: DeprecatedNavigatorRoute): void;replace(route: DeprecatedNavigatorRoute): void;replaceAtIndex(route: DeprecatedNavigatorRoute, index: number): void;replacePrevious(route: DeprecatedNavigatorRoute): void;}